Last Updated on February 27, 2022
Full-suspension mountain bikes are downright fun to ride. Not only can they traverse the seemingly impossible, but they also provide the comfort you need to make you last out in the trails for a long time.
This is made possible thanks to its pivots, which are also called linkages.
However, most mountain bikers don’t know how important it is to service these pivots so that they can make the most out of their rides.
Doing this will make their bike perform better, and help ensure that they stay safe out there when riding technical trails.
What usually happens is that bike pivots are left to deteriorate, either through rusting or lack of lubrication. This is common because riders tend to overlook these linkages.
Fortunately, you’ve found this article. Because here, we’ll be showing you the right way on how you should service MTB pivots. We are also going to discuss in-depth details on how these pivots work so you gain a better understanding of them.
Step 1
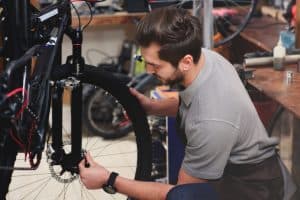
The first thing you need to do is to remove the individual components and parts of your bike.
This way, you will have an easier time servicing the pivots. The parts we recommend you remove from the frame are the front and rear wheel, rear derailleur, fork, rear shock, brakes, and drivetrain.
You can also remove the dropper post or cranks if you’d like, so you won’t accidentally hit them when you’re working your way through the suspension pivots.
When you remove them, make sure that you put them in a single area so that they won’t get lost. It’s best to place them on top of cloth so they won’t roll over to anywhere.
Step 2

The next thing you should do is unscrew each of the bolts that are connected to the pivot.
Make sure that you slowly unscrew them because there are times when there is already a lot of dirt and debris sticking on their surface.
We recommend that you spray silicone spray before unscrewing them so that it will be easier for you to remove them. Silicone spray is very effective in lubricating the surface so that the bolts will just slide when you’re using a tool such as a blind bearing puller on its surface.
After spraying silicone spray, slowly unscrew each of the pivot bolts. Start from the smallest bolts to the largest one so that you won’t get confused. Then place the bolts on a small glass container so that you won’t lose them.
Step 3
Slowly remove the spacers that come with the bolt. What usually happens is that you’ll forget there are spacers because they are not very visible.
Also, note that there are some spacers that sit between the surface and the bearing. Make sure you don’t misplace them. Then place the spacers in another separate glass container.
Step 4
Then here comes the degreasing process. This is the time when you are going to clean the hardware of your bolts by degreasing them.
There are many degreaser products in the market. But we recommend those that have a spraying feature so that you can directly spray them on the bolts.
Step 5
Make sure that you don’t degrease the frame’s bearings because doing this will dry them up. This will then make them unable to move once you put the bolts back in place and make it attract dirt more. Simply clean the bearings using a dry and clean cloth.
Step 6
Now, it is time to closely inspect the frame bearings as well as the shock bushings that come with them.
Check out if there is visible damage around their surface. This way, you can ensure that they roll out smoothly once they’re put back together.
Immediately replace the pivot bearings if they’re already pitted and seized. Or also replace the old ones with new bearings alongside a bearing press kit and suspension bearings with fresh grease.
Also, do the same for the axles and suspension pivots. After that, you can wash the bolts in running water and apply soap. Re-wash them again to get rid of the soap, then wipe them dry using a clean cloth.
Step 8
You can apply grease on the frame surface and cartridge bearings if they have spacers. All you need to do is just stick them directly on the cartridge bearing so that they don’t lose contact with each other.
Step 9
Slowly grease the smaller bolts. But make sure that the area you grease is only the space that is in contact with your sealed bearings. See to it that there is no grease on the threads as this can get messy when you reinstall it back to your frame.
Step 10
Get a thread locker and apply a small amount directly on the threads of the axle. Make sure that there’s no more grease on the surface because this will just clog up the system.
Step 11
It is then time to tighten the bolts and spacers in their respective places. Refit all of the parts and tighten the axles and bolts using your hand.
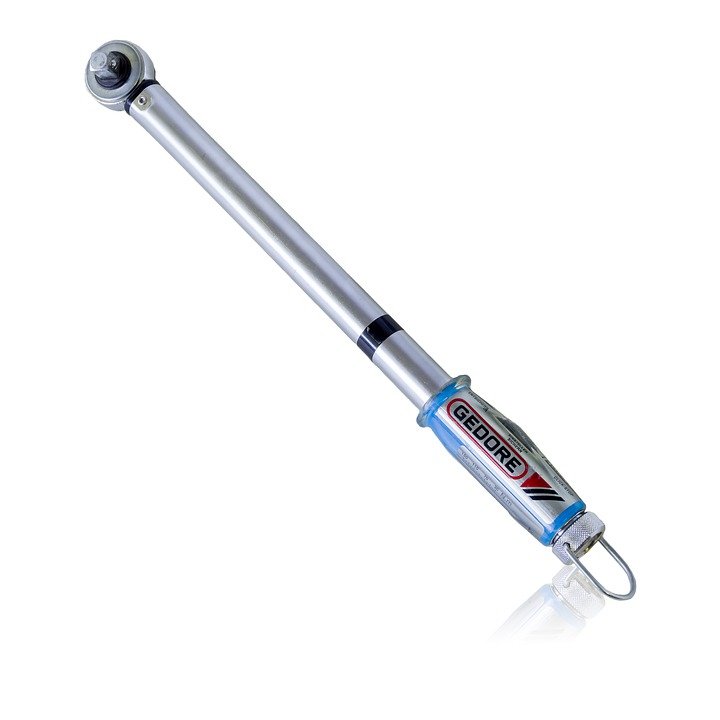
When they’re already back in place, use a torque wrench to tighten them to their required specifications. Then wipe away excess grease and dirt that are stuck on the surface’s thread lock.
Step 12
Once all of the pivots, bolts, and service bearings are back in place and tightened to their specifications, you can then check if the entire pivot system moves freely.
You can try cycling up the swingarm to see if all of its parts are re-installed correctly. Also, make sure that there is no rubbing or fouling.
Re-install back the other bike parts and components you’ve removed earlier. And then do a test ride. If all is well, then you’re good to go on your next mountain biking adventure.
Conclusion
Knowing the right way of servicing mountain bike pivots is important if you want to extend the lifespan of your bike.
Aside from that, it also ensures that your bike and yourself as a rider perform at their best out on the trails. It’s all about giving your mountain bike the TLC it deserves so that you can also make the most out of being a full-on mountain biker.