
Last Updated on August 2, 2022
Mountain bikes won’t run without the cassette, which is considered a part of the drivetrain. In this case, the drivetrain is the bike’s engine.
This is why you need to take good care of it. Proper cassette maintenance is essential to bringing out the best from your bike. And oftentimes, you need to remove it to give it a thorough clean or wash, or maybe you want to entirely replace it with a new one.
But how do you do that?
This article will explain the right way in removing your bike cassette so you can change it without facing any issues.
Things to Prepare
| Image | Title | Price | Prime | Buy |
|---|---|---|---|---|
 | Oumers Bike Cassette Removal Tool with Chain Whip and Auxiliary Wrench Bicycle Sprocket Removal Tools, Bicycle Cassette Lock Ring Removal Freewheel Remover Wrench Sprocket Remover | PrimeEligible | No Results | |
 | Park Tool FR-5.2 Cassette Lockring Tool - Fits Shimano, SRAM, SunRace, SunTour, Chris King, Others | PrimeEligible | No Results | |
 | CRAFTSMAN Adjustable Wrench Set, 3-Piece (CMMT12001) | PrimeEligible | No Results | |
 | Hycline Shimano 7 Speed Bike Cassette CS-HG200 Bike Sprocket,12-32 Teeth | PrimeEligible | No Results |
Chain whip tool
This is the most important thing you need to have because this will be the tool that will separate the cassette from the main hub. You can also use cassette pliers if you don’t have one. But make sure they are the right size and fit for your bike.
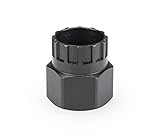
Lockring tool
You also need to have your own lockring tool. There are different sizes out there, so you need to be sure that you choose the right one so that it’ll fit perfectly.
There are also some variants that have a handle which is a better option. You can also use those that have a guide pin so that it’ll be more secure when removing.
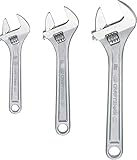
Adjustable wrench
Any adjustable wrench will do. Just make sure that it’s in good condition and that it doesn’t rust. You surely don’t want to use a rusty wrench on your drivetrain cogs, right?
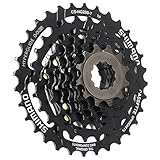
New cassette
Prepare a new cassette if you want to change the old one. Although this isn’t recommended if you think that you can still use the old cassette. It’s still a better choice if you are going to race or you just have the cash to splurge.
Step-by-step Guide on Changing Bike Cassette
Step 1
The first thing you need to do to remove your bike cassette is to remove the rear wheel. Shift the gear into the smallest cog on your cassette. Then slowly open the quick release lever on the side of your bike. But if you have a thru-axle type wheel, you can just unwind it until it becomes loose enough. Then slowly remove the rear wheel from the bike in a sideways motion.
After that, you should loosen the lockring found on its inner sides you might need to use a special kind of splined tool to do this. What usually happens is that you need to use a tool that is specifically designed for your cassette’s brand, such as Shimano or SRAM.
You should also use a chain whip because its lockring is going to unwind in a similar direction compared to your freewheel spins.
The chain whip will then counter the motion which loosens the cogs. Note, though, that you need to exert a lot of force on the bike chain whip when removing the lockring. And you surely don’t want to just do it in the middle of your ride.
Step 2
Then you need to remove the lockring from the cassette. Slowly pull out the lockring from the cogs and then simultaneously remove the old cassette. The motion should be going towards you so you can separate it from its freewheel. You can then just use a zip tie if you want to keep it for later so you won’t lose it.
This is also the time when you need to check your freehub’s condition, knowing that it’s already free. If you observe that it’s already gouged pretty bag by your cogs and these are already scratching the body, then that’s a good enough reason for you to replace it with a new cassette.
However, this is becoming less of a problem these days especially for the branded ones because they are already mounted directly on a cog carrier that has a wide body.
Step 3
Now, it’s time to service the body of your freehub. Do this by greasing it thoroughly. But make sure you don’t do it. Just grease it very lightly so that it won’t be messy. Give your freehub a thorough clean before applying a very light grease coat.
What’s nice about this is that it prevents corrosion if you have steel cogs. But it also works fine on a freehub body made of alloy as it removes dirt and grime which can have a negative effect on your performance.
Then slide the new cassette into the platform. Make sure that all of the splines are lined up correctly. Also, note that there’s going to be a wider gap on the cog’s rear portion. You need to line this up with a wider or double spline in relation to the freewheel of the new cassette and new chain.
Step 4
Get the lock ring and then gently fit it directly on the cassette’s front portion. Slowly screw it into place using your hands. Once you see that it’s already connected and in place, you can then tighten the lock ring rough to hold it in place along with the cassette.
You need to do this step very carefully because what usually happens is that people cross-thread and strip the locking with too much force, which can damage the cassette and new chain.
Step 5
Tighten the cassette in a clockwise direction so that the freewheel provides enough resistance. Make sure that the level of tightness is based on the recommendation of the manufacturer.
You might need to use a torque wrench for this. Also, make sure you don’t overtighten this so that you won’t damage the threads of your freehub body.
You can go to the local bike shop that has a lockring tool, cassette tool, and torque wrench to assure that the gear ratios and quick release skewer are all properly installed along with your lock ring.
Then adjust the rear derailleur’s b-tension afterward and you’re good to go.
Conclusion
Knowing how to change the bike cassette isn’t really that difficult as long as you know the proper method.
Hopefully, this article helped you with just that. Just remember to use the right tools, be gentle when handling the cassette, and always practice due diligence especially when you’re servicing the freehub body.
When you do, then you’ll be riding your bike in the best way possible you can ever imagine.